| Guide to Being an Effective Rifleman |
|
~Introduction~ This is my guide on being a good rifleman. The Rifleman is one of the longest existing positions in a squad. The Rifleman was used first at the Battle of Saratoga in the Revolutionary War, in which American Riflemen defeated the British under Burgoyne. The Rifleman was especially used in WWII, as a main assault supporter. The rifle has a long barrel that is riveted, spinning the round, and increasing accuracy. The Rifleman generally must have a good feel for his weapon, and this is key for success. Whether you have an M1A1, an SVT-40, a Gewehr-43, or an M1 Garand (the STG-44 will not be included, gohere for a guide. In this guide, I will include your weapons (background info, clip size, and other things of importance), tactics, the rifleman’s jobs on the field, good attachments, classes and map strategies, such as which rifle to use for each faction. For the sake of simplicity’s sake, I used an SVT-40 while writing this guide. I used the others, just not as much. Here we go! ~WEAPONS INFO~ This section gives you some information about the rifles, and are color coded depending on faction: Orange=Soviets, Blue=Americans, and Yellow=Germans. The Japanese have no rifles. SVT-40 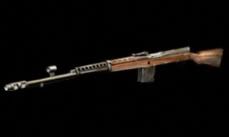 A Russian production rifle that is very durable, the SVT-40 was used in Russian during the defenses of Stalingrad, Leningrad, and Kursk. The Russians won at all of those battles, and it was largely due to the T-33 tanks, the Russian pilots, and the Russian riflemen. Unlocked: Level 1 (Rifleman default class) Clip Size: 10 Reserve Shots: 120 Fire Rate: Semi Auto Damage: 3 hits without SP, 2 with SP Iron Sights: 9/10 Reload Time: (empty) 5/10 (not empty) 6/10 Attachments: Flash Hider (25 kills), Aperture Sight (75 kills), Telescopic Sight (150 kills) Recommended Attachment: Aperture Sight Good Maps: Asylum, Downfall, Makin, Airfield, Dome (more on that later), Castle, Seelow, Outskirts, Upheaval, and Courtyard. Gewehr-43 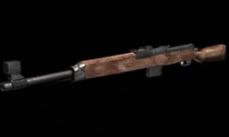 The Gewehr-43 was designed by the Germans for the sole purpose of deterring the Allied assault on the Netherlands and surrounding country (Holland and Poland). A ten shot rifle that never took part in any offensives, the Gewehr-43 was often carried by German grenadiers. IMO, the Gewehr has the most friendly iron sights in the game. Unlocked: Level 6 Clip Size: 10 Reserve Shots: Fire Rate: Semi Auto Damage: 3 hits without SP, 2 with SP Iron Sights: 10/10 Reload Time: (empty) 4/10 (pretty suckish) (not empty) 5/10 Attachments: Suppressor (25 kills), Aperture Sight (75 kills), Telescopic Sight (100 kills), Rifle Grenade (150 kills) Recommended Attachment: Grenade Launcher if you like to kill campers with it, Aperture Sight if not. Good Maps: The Gewehr is good on almost every map, just don't rush in on Close Quarters maps such as Hangar and Dome. M1 Garand 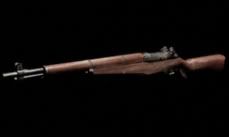 The heavy, faithful, M1 Garand was design weapon in the United States that was favored by the Army Rangers and Marines for its durability, and heavy power. It was disliked by paratroopers, as it was heavy, and the Airborne preferred the M1A1 Carbine. Has iron sights similar to the M16/M4's, so you might want to familiarize yourself with those sights. Unlocked: Level 17 Clip Size: 8 Reserve Shots: 56 Fire Rate: Semi Automatic, has a barely detectable delay in between shots (you can fix that with Double Tap) Damage: 3 hits without SP, 2 hits with SP Iron Sights: 7/10 Reload Time: (empty) 8/10 (only gun to reload faster when empty) (not empty) 7/10 Attachments: Flash Hider (25 kills), Bayonet  (75 kills), Rifle Grenade (100 kills), Sniper Scope(150 kills) (75 kills), Rifle Grenade (100 kills), Sniper Scope(150 kills)Recommended Attachment: Up to you, I prefer the Bayonet. Good Maps: Any map where you can hang back, but engage at close range if need be, something like Upheaval, or Hangar. M1A1 Carbine 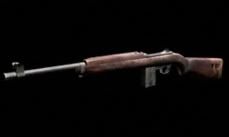 The light, compact, godly weapon used by the US Airborne, as it was lighter, had more rounds to a clip, and was in all, better, than the M1 Garand. The M1A1 was the main weapon carried in Operation: Market Garden, and Operation: Varsity. Unlocked: Level 65  Clip Size: 15 (no extended clip) 30 (extended clip) Reserve Rounds: 75 (no extended clip) 90 (extended clip) Fire Rate: Semi Automatic Damage: 3 hits without SP, 2 hits with SP Iron Sights: 7/10 Reload Time: (empty) 7/10 (not empty) 8/10 Attachments: Flash Hider (25 kills), Aperture Sight (75 kills), Bayonet (100 kills), Extended Clip(150 kills) Recommended Attachment: Aperture Sight Good Maps: Just about any map is good, only skip Dome. ~MAP STRATEGIES~ NOTE-Blue=Americans, Red on a map with blue=Japanese, Yellow=Germans, Red on a map with Yellow=Russians. Also, starting points are marked by a thick, big circle(filled in all the way),routes to take on 2nd floors are filled in incompletely filled circles. Lime green maps are good, cyan are average, and orange should be avoided. ~Airfield~-I prefer to use the M1A1 on this map, as it has a larger clip, which you will need. I don't really use rifles here, as I prefer to go with a sniper rifle. 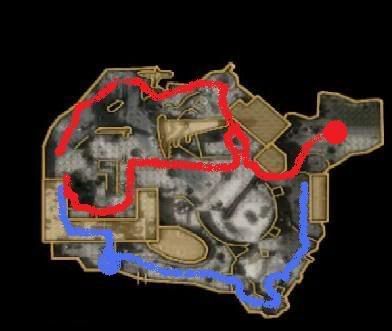 ~Asylum~-Please note that the Russians start on the top floor. Use either a Gewehr or SVT-40 here because the M1 Garand and M1A1 have longer reloads, and you will find yourself doing that quite often. The top floor's outline is thicker than the bottom. All in all, this is a good place to play with rifles, if quick reflexes you have. 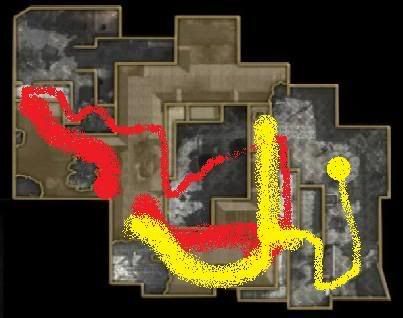 ~Castle~-Not much to say here, except you would be better off sticking to the outsides and camping the two courtyards. Use an M1 Garand with a Rifle Grenade here, or an SMG. 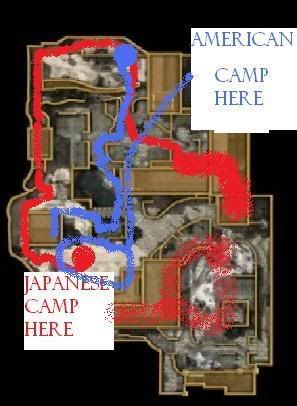 Cliffside-This is a great place to use the Telescopic Sight, as it is large, open, and sniper ridden. Using the Telescopic Sight gives you a (basically) M21. Even better yet, use an M1 Garand with a Sniper Scope. I will mainly point out spots, rather than routes. 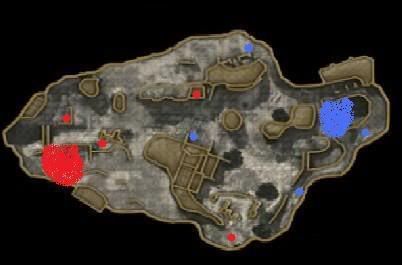 ~Courtyard~-Not a good place to use the rifles on. I would go with an SMG unless you have had someone who is great with rifles say you are great as well. Then, I would stick a bayonet on an M1A1 and hit the fight. Here are a few paths you can take here. Note that some of these have you patrolling the perimeter. 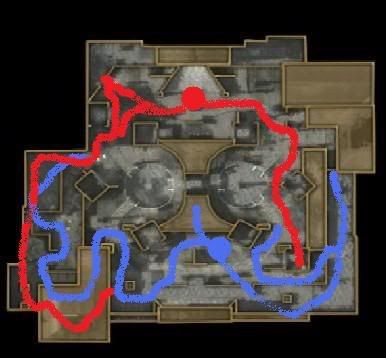 ~Dome~-Again, follow Courtyard's specifications. M1A1 with a bayonet is your best bet, if not use a bayonet on the M1 Garand (it is not that bad, people!). Anyway, try to shoot into fights, you draw less fire and live longer that way. 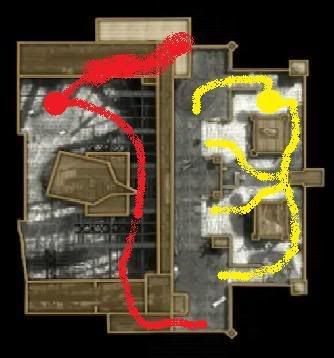 ~Downfall~-Do yourself a huge favor on this map, Roundhouse, and Outskirts, and stick to the outskirts or very interior where it is too tight for the tanks. I prefer the outskirts, but you can go in the tight part, just keep in mind you don't have a close quarters weapon. Mainly, just don't play here. Normally, one should use a sniper rifle here. 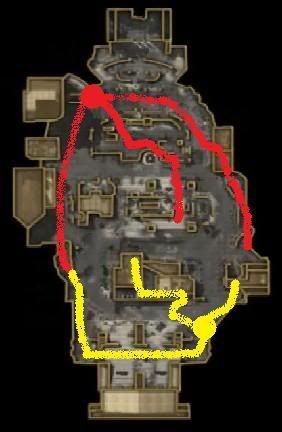 Hangar-Do yourself a huge favor here, and don't play here, at least with a rifle. This is driven by a biase (did I spell that right?) against Hangar, and just the inefficiency of rifles here. Use a sniper or an LMG on this map, and camp the buildings. 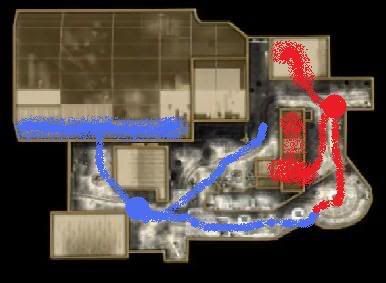 ~Makin~-Stick to the outside, and mainly patrol the outside. The northern sacrament for Buddha is a great place to camp, as your soldier's camo will hide you. Other than that, play at your own risk. 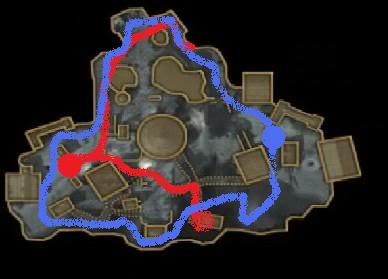 ~Outskirts~-See "Downfall". Please note that the church tower and surrounding area is to be avoided at all costs. 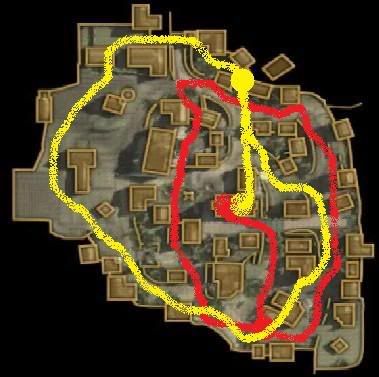 ~Roundhouse~-See "Downfall" 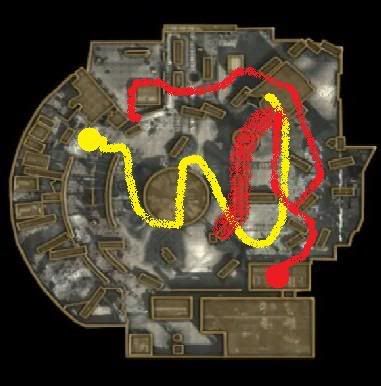 ~Seelow~-If you are the Germans, camp in the bridge or the wheatfield. The Russians are mainly on the assualt here, and the Russians can easily pin down the Germans from the bridge, bunker entrances, and houses. Please note that there is a sewer on the German side, towards the back, that no one goes in, but passes. Feel free to camp there and rack up kills, just beware of enemy grenades, as one in a cramped space like that will kill you. You also don't have to crawl through the tunnel, you can crouch. 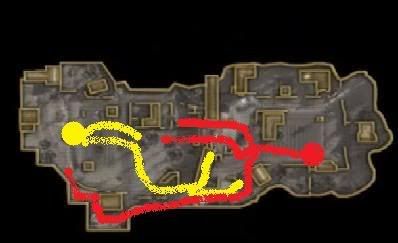 ~Upheaval~-The Russians should set up two guys with Bouncing Betty's and Telescopic Sighted SVT-40's, and wreck havoc on the Germans. The German's need to infiltrate the forward buildings, and the Riflemen should crouch in the alleys, taking potshots at the Russians, dropping back into cover to reload. 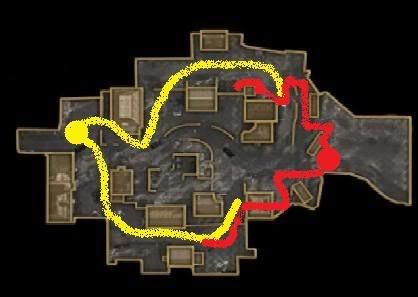 ~TACTICS~ ~Normal Tactics~ When to Engage: You should be engaging before the enemy sees you. If they see you, you do one of two things: you a) run or b) shoot from the hip as you run side to side. I prefer the second tactic, just because you get the kill more often. However, you will need Steady Aim to pull this off. Shooting Back: Make sure that you find cover before you attempt to answer an enemy. Also, plan your assault. I will cover how to counter certain weapons later. Taking potshots is a necessity, that is, take a few shots, then duck behind cover. This tires them out and they might leave, allowing you to follow their sorry asses, or they will expend their clip into your cover, and you can kill them while they are reloading. Reloading: Make sure you are behind cover. That’s really the only thing, except to make sure that you are never ever ever moving when you are reloading. You might run into someone. Shot Selection: I might sound like a sniper (I’m not, I can’t stand it) but only take shots you KNOW you can hit. Since only noobs use Flash Hiders on a Semi-automatic gun, you will expose yourself by taking shots at enemies who are rounding corners. (Going the other way) ~Counter Tactics~ Other Riflemen: This is the hardest. Make sure that you have a full clip, and if you don’t have Stopping Power and Tabun Gas this won’t work, and throw a Gas at them. It doesn’t have to be near them, but they will (probably) turn their back. You should jump out, and kill them with two shots. SMGs: These guys you need to be patient. Don’t charge, or you will die. Don’t give them any chances to come around a corner and lay into you. The best chance you have is to jump up, fire a few shots at them (you don’t have to score hits) and run. As you are running, you are faster, and they will sprint. Turn around, and pop them. Shotguns: Read SMGs above. Just stay farther away. Snipers: Get close. This is your only hope, that and Tabun/Fragging them, and charging. Once you are tight, just let loose. You will surprise them, and get the kill. Remember, look for the two P’s, Presents and Prongs (Satchel Charges, and Bouncing Betty’s). MGs: Wait for these pesky blighters to set up shop, pop out, take a few shots, and retreat. Throwing a Tabun Gas in and then shooting is effective as well. Also, it gets you towards the Tabun Gas kills. ~TIPS~ Range:Make sure to engage from medium to long range, as this does two things for you: one, it makes it harder for them to find you, as the field of vision from the hit grows larger, and two, it gives you more time to get away, if in fact they do find you. If your any sort of rifleman, however, they shouldn't. Taking On Multiple Enemies: This is a situation that is a "lose-lose" for you. Most of the time, you won't escape this situation. At range, this is no problem. However, if it is close quarters, you are screwed. Your weapon is a two hit kill, sure, but you also have a Semi-automatic weapon. My best advice is to throw an uncooked frag, and then run, until you are far enough away, and then turn around and pop the rounds into them. Or, you can always take them on, right here, right now. This is harder, as you have (probably) a smaller clip than them, and you are outnumbered. First of all, which rifle do you have? If you have an M1 Garand, pull out your sidearm. This is because they both have the same clip, and the M1 Garand has a delay in fire time, and your sidearm doesn't. Make sure you don't aim down the sights, and keep moving. Unless this is CTF or S&D, you should have Steady Aim. So, two or three bullets is bound to hit them, and kill them. If you run out, start to cook a grenade, if you have one left. This is a handy Martyrdom, and if you don't get instantly killed, throw it. Then run, pulling out your rifle, and reloading the weapon you used for combat. Bayonet Charges: If you are using an M1 Garand, or an M1A1 with a bayonet, this is the section for you. First things first, make sure your clip is full. Why you ask? This is because if they dodge your attack, you will have to use your weapon. Or if another enemy jumps out, you will have to use your rifle. Anyways, when charging, always serpentine. Serpentine is running in a curvy line, with no pattern. A good player will figure you out, and take you down. Jumping and changing your stance and speed is a good tactic, as well. Make sure to time your attack right, as lunging to early is the death of you, at nearly a second recovery time. Also, make sure you are within sprinting distance of them. This is because you don't want to be about to stab, then pull up. You miss, and they whirl around and plug you one. or two, or fifty. Retreating: If you have been discovered, and are being charged, you have one option. Retreat. Retreating is quite simple. Actually, you can even use it to retreat them into an ambush (via mic). First: Pop a special nade into the area. I think Tabun Gas works best, as they can barely move or see. But, be warned, you only have three seconds. Once you have let go of the gas, turn and sprint back to a good spot. Once you are far enough away, turn around and backpedal, picking off enemies who present themselves. ~Jobs on The Field~ Covering Fire: This is what the Rifleman’s main job should be at all times. You should be shooting at the enemy when your teammates tell you to, and when they don’t. Cover your allies advance, and then rejoin them. Keep a steady stream of fire up at all times. Rifle Grenading: The rifleman and the bolt-action man with a rifle grenade can only do this, but at this point, Mr. Bolt-Action is a rifleman. He should just engage from farther. This is where a rifleman provides support by staying still for about five seconds, zeroing in on a cluster of enemies, and killing them. Make sure to practice in split screen with the “Demolition” class. Assault Leader: This is a huge responsibility. You are in charge here, and on the front line. The best way to do this is to create a squad, and set waypoints. You can split up your guys, but you must be able to think on your feet. Scout: This is what you should be doing when they don't have a Recon Plane, and you have a Flash Hider/Suppressor. It involves you mainly laying in bushes, gathering info about either a) their flag in CTF or b) the targets in SnD. It is very dangerous to do this, so don't be discouraged if you die multiple times. Only shoot when you have to do so. Commander: This is a hard job. You are running the show when you are commanding. This means that you have final say in all tactical situations. You need to have a great shot with your weapon of choice, as you will need to be picking enemies off while commanding an assault. Keep in mind that you must keep your mind on your teammate's battles, as well as your own. ~ATTACHMENTS~ Flash Hider/Suppressor(FH/SUP) 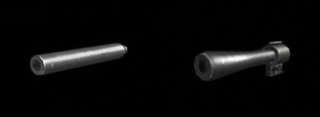 This attachment should NOT be used for ghosting. First of all, you should be using an automatic weapon to ghost. Second, why? I mean, seriously, just use this until you get the Aperture/Bayonet, then dump it. A good thing is you don't show up on the radar, and can be a great assassin, or scout, if you are very proficient. The Gewehr is, in my opinion, the best Suppressor/Flash Hid weapon. Aperture Sight (AP) 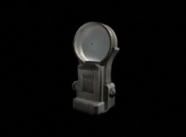 Personally, this is my second favorite attachment on the Gewehr, and my favorite on the SVT-40 and M1A1. It makes aiming much easier, as you can just aim, find their head, put the black dot on it, and pull the trigger a few times. I prefer the SVT-40 in this category. Telescopic Sight (TS) 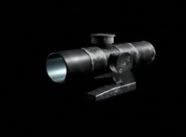 The Telescopic Sight is ok for huge maps, but other than that, I would skip it. Best used for those of you to cheap to go out and fight, so you are camping, the Telescopic Sight offers two times zoom on your ADS. I like the M1A1 in this category. Sniper Scope (SS) 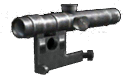 The Sniper Scope is basically a more powerful Telescopic Sight. It is only available for the M1 Garand. Use it as you would use a normal sniper rifle. I like the M1 Garand with this. Bayonet (B) 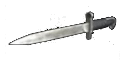 This attachment increases the range of your melee attack. It is available only on the M1 Garand, and M1A1, and should be used in tight maps, like Hangar, Dome, and Asylum. I like the M1A1 with a bayonet on it. Rifle Grenade (RG) 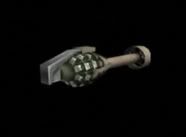 The Rifle Grenade is my personal favorite attachment for the Gewehr and M1 Garand, as they are the only ones with it available. Use it to strike at long range, and you will have success. Practice, as said above, in split screen with the Demolitions class. I like this on the M1 Garand. - ~CLASSES~ This is a section of class recommendations. Vehicle Perks, Grenades and Pistols are up to you. Rest In Pieces SVT-40(AP) Primary x2 Stopping Power Steady Aim Assassin Gewehr(SUP) Bomb Squad Stopping Power Steady Aim Mr. Robinson(Watch SNL Christmas with Eddie Murphy for an explanation) Gewehr(SUP) Bomb Squad Camouflage Steady Aim Oh, butcha don'tN00B! M1 Garand (SS) Bouncing Betty's Stopping Power Iron Lungs CHAAAAAARGE!!!!! M1A1 (B) Primary x2 Stopping Power EC (for charging with the bayonet) Grenadier M1 Garand (RG) N/A Stopping Power Steady Aim |
